
Sometimes, old recipes get lost—not because they were not good, but because life changed around them. People moved, markets opened, new foods replaced the old ones, and slowly… traditions faded. But every now and then, someone finds a forgotten recipe and brings it back to life. And that moment feels like opening a small treasure chest from the past✨.
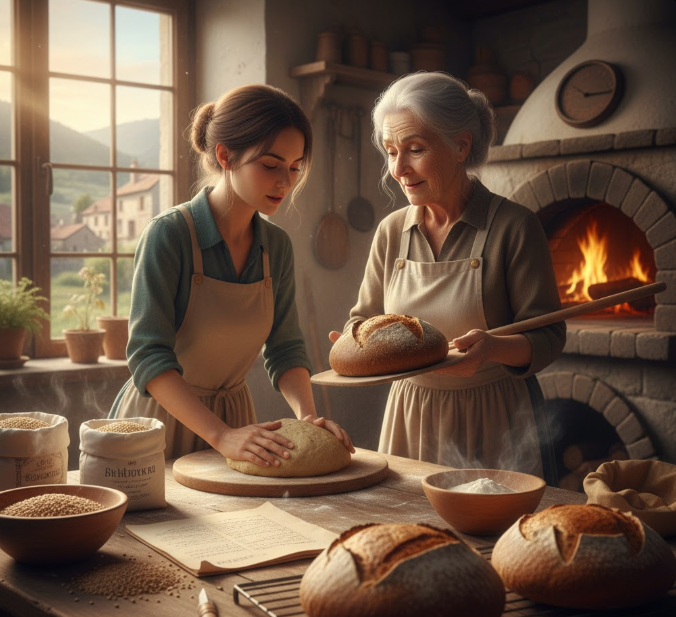
This is the story—and the detailed guide—of a 200-year-old village bread recipe that almost disappeared. It comes from a tiny rural community where everything was simple: clay ovens, wooden tools, slow mornings, and flavors shaped by the earth itself.
Today, we don’t just talk about that bread. We revive it. We recreate it. And we understand why it even existed in the first place.
Let’s go step by step, keeping everything simple, natural, and very human.
Where This Old Bread Came From
The bread was born in a farming village where wheat was not always enough. Families used whatever the land could give: barley, millet, leftover cracked wheat, and sometimes even roasted gram flour. Nothing was wasted.
The interesting part?
The bread wasn’t made for taste—it was made for survival. But survival food, when made with patience, often turns into something magical.
The villagers used:
Stone-ground flour
Water from the village well
Natural salt from dried lakebeds
A fermented dough starter (they called it “the sleeping dough”)
Coarse grains to make it filling
The recipe didn’t use machines. It used hands, warm sunlight, and a clay oven that gave the bread a smoky, earthy smell you just can’t fake.
Why This Bread Got Lost Over Time
Older people say the recipe faded away for simple reasons:
Grains changed over the decades
People moved to cities
Modern bread became easier to buy
Clay ovens disappeared
Younger generations didn’t want to spend hours making dough
But the biggest reason?
The recipe was never written. It was passed from one pair of hands to another. And then… one generation forgot to pass it on.
The Moment the Recipe Was Rediscovered
A few years ago, an old woman in the village—nearly 90—mentioned a bread she used to make with her mother. She described the smell, the crackling sound of the crust, and how it stayed soft for three days.
People gathered, listened, and slowly pieced together the missing details. Some parts were clear. Others were rebuilt by trying again and again.
And after several attempts, the lost bread finally returned.
What Makes This Bread So Unique
There are a few things that make the recipe stand out even today:
It uses three grains instead of one
It uses a natural starter made without yeast
It is cooked on a clay oven wall, not a tray
The dough is kneaded for nearly 30 minutes
The bread has smoky, earthy, slightly nutty flavors
It stays fresh longer than modern bread
This bread is not soft like modern buns. It has a firm shell, a warm center, and a rich aroma that feels like walking through a field after rain 🌾.
Ingredients (Authentic Version)
Below is a table to keep everything neat and informative:
| Ingredient | Amount | Purpose |
|---|---|---|
| Barley Flour | 2 cups | Gives earthy flavor and texture |
| Whole Wheat Flour | 1 cup | Helps hold the dough together |
| Millet Flour | 1 cup | Adds softness and nutrition |
| Water (lukewarm) | As needed | Activates the starter |
| Salt | 1 tsp | Balances taste |
| Old Dough Starter | 1 small handful | Natural fermentation |
| Coarse Grain Mix | 3–4 tbsp | Adds crunch and fiber |
Note: If you do not have the old dough starter, you can replace it with a homemade fermented mixture (explained below).
Making the Natural Dough Starter (The “Sleeping Dough”)
This step matters the most because the starter creates the bread’s natural rise and gentle sourness.
To make it:
Mix 2 tbsp wheat flour with a little water.
Cover with a thin cloth.
Leave it in a warm corner for 24 hours.
Next day, add 1 more tbsp flour + a little water.
Repeat this for 3 days.
Soon, bubbles will form. The smell becomes slightly tangy.
This is your natural yeast.
It works slowly, but that’s the beauty of it.
Step-by-Step Preparation of the 200-Year-Old Bread
1. Preparing the Grain Mixture
In a large bowl, add barley, millet, and wheat flour. Mix with your hands so the textures blend well. This hand mixing is important because it warms the flour a little.
2. Adding the “Sleeping Dough” Starter
Make a small well in the center of the flour.
Drop the fermented dough starter into it.
Use fingers to slowly mix it around.
3. Adding Water Slowly
Pour lukewarm water in small amounts.
The dough should not be sticky or dry—just firm and smooth.
4. Long Kneading (This Part Is Powerful)
Villagers kneaded for nearly 30 minutes.
You can take small breaks, but don’t skip this part.
It makes the bread stretchy and perfect.
5. Adding Coarse Grains
Sprinkle them and fold gently.
They give that traditional, rustic bite.
6. Covering and Fermenting
Cover the dough with a cloth.
Let it sit for 3–4 hours.
The dough will grow slowly—not like modern yeast, but more naturally.
7. Heating the Clay Oven
Traditionally, the bread was slapped onto the inner wall of a tandoor.
If you don’t have one, use a thick flat pan and keep the flame low.
8. Forming the Bread
Make round flat discs.
Press fingers lightly in the center to help heat spread.
9. Cooking
In a tandoor: stick the dough to the wall
On a pan: cover with a lid to trap heat
Cook until:
The edges turn dark
The center becomes firm
You hear a light hollow sound when tapping
And that’s it.
Your 200-year-old bread is ready 😄.
Taste and Texture: What to Expect
This bread is not sweet or buttery.
It’s honest.
It tastes like grain, sun, and smoke.
If food could speak, this one would whisper old stories.
A few things you’ll notice:
Firm crust
Soft inner layer
Light sourness
Nutty aftertaste
Very filling
Add butter, honey, or lentils and you feel like you’re eating history.
Nutritional Benefits
Here’s another quick table to show why villagers relied on it:
| Benefit | Why It Happens |
|---|---|
| High fiber | Because of barley + millet |
| Slow energy release | Perfect for long working days |
| Natural probiotics | Fermented starter |
| Strong minerals | Stone-ground grains |
| Long freshness | Natural fermentation |
Even modern dieticians would approve of this old recipe.
How Villagers Used to Eat This Bread
This bread was not meant for fancy meals.
It was eaten with:
Warm lentils
Butter or ghee
Buttermilk
Pickles
Roasted vegetables
Tea (yes, they dipped it in tea!)
The bread was also taken to fields because it stayed soft for hours.
Small True Story From the Village
An old man shared a sweet memory:
When he was a child, his mother would bake this bread early in the morning. He said the smell used to wake him up before sunrise. He would sit near the clay oven because the heat felt good on cold winter days.
The first bread his mother cooked was always given to him.
And he said that even today, after 70 years, no bakery bread tastes like that first loaf.
Sometimes, taste is more than flavor—it’s emotion.
How You Can Modify This Bread Today
Here are some modern variations:
Add herbs like rosemary
Add crushed garlic
Add sesame seeds
Replace millet with oats
Add a small spoon of honey for a mild sweetness
Cook on a pizza stone for a similar clay effect
All versions still keep the soul of the original recipe.
Why Bringing Back Old Recipes Matters
When we revive a recipe, we revive:
History
Culture
Lost methods
Forgotten skills
Connection between generations
Food is not just food.
It’s memory.
And memory needs to be kept alive.
Tips to Make It Even More Authentic
Use stone-ground flour if possible
Use clay cookware
Knead with hands, not machines
Let dough ferment slowly
Cook on natural flame, not electric heat
These little things change everything.
Frequently Asked Questions (FAQs)
Q1: Can I make this bread without the fermented starter?
Yes, but the taste will not be the same. You can use a pinch of yeast as a quick replacement.
Q2: Does the bread become too hard?
Only if you overcook it. When done correctly, the crust is firm but the center stays soft.
Q3: How long can this bread stay fresh?
Up to 2–3 days without refrigeration, because barley and millet naturally resist spoilage.
Q4: Why is the kneading step so long?
Old grains need more physical mixing to form elasticity. This helps the bread cook evenly.
Q5: Can I bake it in an oven?
Yes. Set the oven to 220°C and bake until the top turns golden brown.
Q6: Is this bread healthy?
Very healthy. It has fiber, minerals, and slow energy release, making it ideal for busy people.
Q7: Can I freeze the dough?
Yes. Just wrap it tightly and thaw before cooking.
Final Thoughts
Reviving a 200-year-old village bread recipe is like bringing back a lost voice from the past. It reminds us that simple foods, made with patience and love, can be richer than anything modern. This bread carries the warmth of clay ovens, the wisdom of old hands, and the honesty of natural grains.
If you try it even once, you’ll feel the difference.
Not just in taste—but in the story it carries 💛.